You know how people make up their dream house plans in their heads? Well, my dream house has always included a rather elaborate library. If you've seen Disney's Beauty and the Beast you may have some idea what I mean... towering bookshelves at least two stories high with ladders on roller systems to get to the best books, which are always way up on top. Well, I'm tired of waiting for "some day" to come.
So the question is "Why can't I have a home library
now?" Well, practically speaking ...
1. I live in a two bedroom, 1200 square foot duplex with three kids who all share one bedroom
2. The kids include one girl - 17 yrs old, and two boys - 20 months and a 6 year old. (My 19 year old son is out on his own, so in this instance, he doesn't count (no offense K).
3. I run a home daycare, so the house is also crammed with toys and baby equipment.
4. We do not have a den or family room.
5. There is not a single bit of extra space in the house.
So the odds of having a nice, quiet, relaxing library space are basically nil. I got to thinking that perhaps the garage was a good candidate. After all, my sewing room is out there. But the garage has gotten a little over-run with junk. It was organized last year, when we put up 6 very large industrial 6-foot-tall shelves. We managed to get most things up on the shelves. I even moved three bookshelves out there and had them together in an area. This was mostly done out of necessity, as there was nowhere else in the house to put them. They were all crammed full, with the largest one holding two rows of books on each shelf (they are deep shelves). And here's what had become of our nicely organized garage when people started carting things out and not putting them away...

The area to the left is where I hoped to put a library. The area to the right is my buried sewing room. Now keep in mind, this is my garage we're talking about. The house is
much neater! But when you lack space, and you also lack organization, you end up with overwhelming piles. Nobody knows where to put things, because nothing has a specific place, so everyone just walks out and dumps.

This had gotten very out of hand. We had to climb piles of stuff if we needed one of the books on those shelves.

The sewing room was actually functional, but I have to admit that I didn't really want to spend time in there. Who would, when it looks like this? It certainly wasn't a haven.
Well, then came a dilemma. We were hoping to be able to rent the other half of our duplex to use for the daycare. Our oldest had been living over there for 5 months, ripping out carpet, repainting, etc. for the owners, who are our friends and my husband's employer. We had already sort of spread out into his garage. So when we learned that the employer's sister was going to move in over there, we knew we would have some drastic re-organizing to do in order to fit our stuff back in our own space.
It turned out to be a blessing in disguise. We sorted, donated, recycled, and threw out a bunch of stuff, and in the process of reorganizing, I was struck with the idea of creating the library I've always wanted. (Well, okay, so it's not the one I have planned out in my mind, which includes a fireplace, huge, cushy leather chairs and floor to ceiling built in shelving throughout the room, but it's as close as I'm going to get in the place we are now.)

The space now contains 6 bookshelves, a cushy leather office chair, two tall 4-drawer filing cabinets (those were already there too) and a small desk.

These two bookshelves sit on top of a dresser that our old neighbor left for us. The dresser is solid wood and very heavy - and very nice. He bought it new and had it less than 3 years. It faces my sewing area and holds a variety of sewing supplies and projects. Putting the dresser there accomplished a couple of important things. First, it divided the rooms. Now you have to walk through a small "doorway" between the dresser and chest freezer in order to "enter" my sewing room. This should cut down clutter. (That and the fact that the children have been banished from this space unless they are actually sewing.) It also provides a great place to keep my current projects separated, and has plenty of space for supplies. When I put it in, though, all I could see was the top of a dresser that would be a catch-all for piles of junk again. That's when it struck me that I could put the bookshelves
on top of the dresser. (This is not an entirely new thought, as we already have two long dressers like this stacked one on top of the other in our master bedroom - one for my husband and one for the one-year-old. We were out of floor space inside too.)

I love how this provides a barrier between library and sewing area. The desk was a happy accident. It was one of the last things that had to be moved from next door and there wasn't anywhere else to put it. I backed it up to the dresser, and it makes a great study area. My six year old spends a lot of time at this desk drawing and coloring while the daycare kids nap in the afternoon.

Here's a better picture of the dividing shelves. I'll give you a tour of the new sewing space tomorrow. The shelves are somewhat organized, but I will need to go through those one of these days and edit and organize. I also have more books coming in the mail, so I will need to make space for those too.

There's quite an assortment of books in this space. Everything from classics, to homeschooling books, to hymnals and sheet music, old Taste of Home magazines, recipe books, and the big tall shelf behind the office chair is all Bible study related books. My husband is a Bible college graduate. The Bible shelf is still mostly double stacked, and I still have books in boxes out here too.
So not everyone has an exercise bike in their library, and that doesn't exactly evoke thoughts of relaxation, but then not everyone has a treadmill in their sewing room either. But I'm guessing by now you've figured out that I march to my own drum beat. Not to mention, I don't have room indoors for an exercise room either - ha.

So what's this awkward empty space? It is going to be my indoor built in bookshelves ... eventually. This is a very odd space that was left when the designer of this home couldn't figure out what to do with it - ha. No offense. We love the layout of the home, but at the end of the hallway to the bedrooms, the bedroom doors angle into the rooms - you walk toward a "v" shape at the end of the hallway, where the doors connect. But this little space is left over. It's a good amount of space - almost 20 inches wide and 30 long. I had one of the bookshelves here, along the longer wall section, but it fit so well in the garage that I moved it. I have all the materials for creating built in shelves - floor to ceiling - along the shorter section. I've just been so busy with getting the garage in order and our junk out of the neighbor's way that I haven't had a chance to put this together. Maybe this weekend ... but then that's what I've been saying for a month, lol. No rush now that I've got my garage in order. I'm going to take some time to enjoy that space! Besides, I've been thinking, maybe I'll make an "L" shaped bookshelf and extend the shelves onto the longer wall too. I'd need more supplies for that though, so I'll probably just start with what I had planned, and see where it goes from there. That's how I approach all my projects.
Anyway, hopefully I've inspired some of you to make the most of what you have and quit waiting for someday. Oh, and by the way, did you notice, I now have "floor to ceiling" bookshelves? Just like Beauty and the Beast ;)
 So of course I had a little shopping to do. This collection above is the fabric I chose for my Over the River quilt. I've talked about this quilt before. It has a lot of hand embroidery on it. My paternal grandmother taught me to embroider, so this is being done in honor of her. Here is a picture of the pattern, though you can see it better in this link:
 Sorry for the glare. It's hard to see but that bottom embroidered section is a picture of a farmhouse and barn, with a fence leading up to it. The layout of the farm is identical to Grandma's place, and the house is very similar to hers. I had to do this pattern! Such a perfect tribute.
 Anyway, black and white didn't seem right to me. I wanted fabrics and colors that would remind me of her, so these are what I chose. These three larger prints will take the place of the black fabrics in the pattern.
 Here are all the fabrics with their coordinating shades. I'm not sure there's enough contrast to pair these together in the blocks, so I think I'll put a green with a pink, etc, rather than using the two different greens in one block. Actually now that I'm looking at this, I'm a little concerned that I'll lose my block shapes in these similar colors, so I'm gonna have to think about how to put these together, and probably have to just cut a few and play with the shapes. The blue was my favorite, but they were out of the contrasting blues, so I picked out a beige with little stars on it. It's hard to see it in the picture, but it was the perfect choice sentimentally. Grandma was a teacher and at her funeral, the minister cut an apple in half horizontally and showed the star stape inside. It was a moving tribute I will never forget.
 The darker blue on the left side is going to be the inner border and the binding. The dark beige next to it will be the horizontal lines separating the embroidered sections from the block sections. Or at least that was what I was thinking when I bought it. Like I said, I may have to play with this for awhile before I get it all figured out. Also, I somehow missed taking a picture of the unbleached muslin I will use for the embroidery background. It is beige with little black flecks here and there. It will coordinate well with these prints. Now, on to some fabric for my 17 year old daughter...
 I spent a lot of time taking pictures of bolts of fabric with my phone and sending them to my daughter who was back home with our little guys. Since we homeschool, and I make the rules ;) she has a sewing class. I have assigned her a number of projects in different categories for credit in home ec. She has to finish her quilt, make a certain number of clothing items, household items, accessories like purses or whatever and such. She gets to pick the exact projects, so long as they fit into the given categories. She's having fun with it. I think all these prints will end up being clothing items. I told her I would supply the patterns but she has to buy her own fabrics. Well, on Saturday, Hancock Fabrics was having a big sale, so she was able to get most of these for around $2/yd. Her favorite is the purple in the picture above.
 I like this one the best.
 This print is so her. She had a shirt with a similar pattern in all blue shades several years ago and it was one of her favorites.
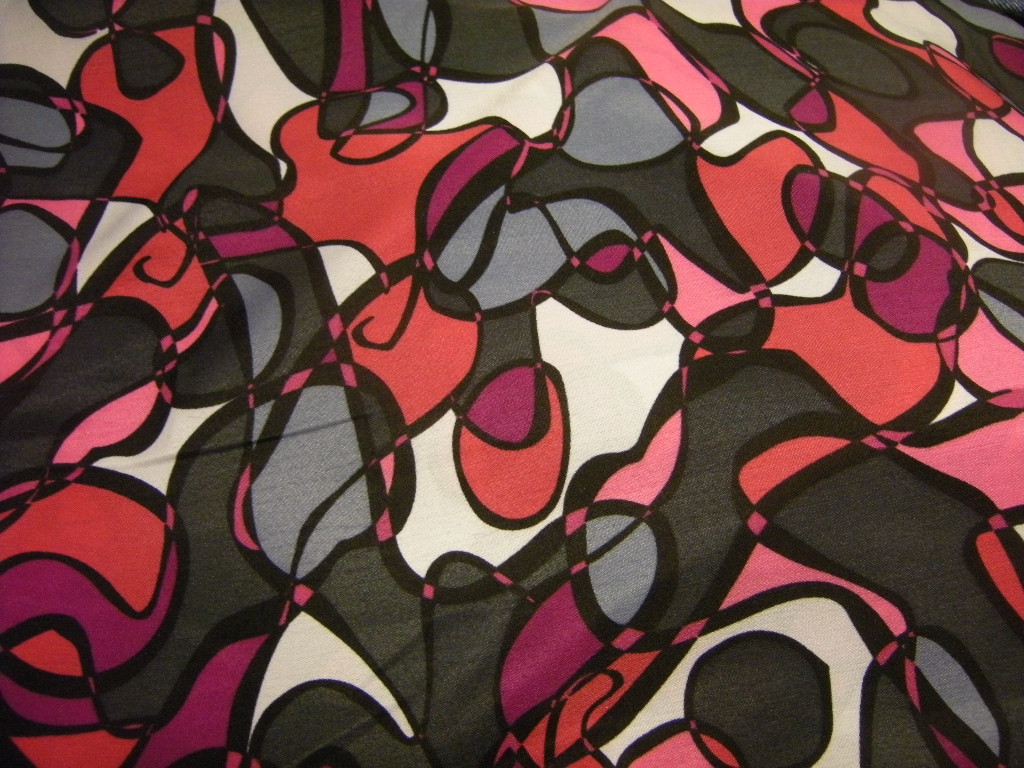 The color on this photo isn't very accurate. The print is actually bright pink, light pink, purple, and grey. Very pretty, but the picture doesn't show it.
 They had Butterick patterns on sale for 97 cents, so I grabbed an assortment of those, and then picked up a few New Look patterns at Walmart.
 These are all pretty much in my daughter's size, and I wasn't sure if she would like them or not, but for under a buck, I figured I could take a chance. And the Walmart ones can always be returned if she didn't like them.
 Unfortunately I didn't think about the fact that all her fabrics are pretty, and would drape well, but are NOT knits and don't have any stretch to them. So I doubt she will be able to do any of these shirts with those fabrics :(
 The pattern on the left actually covers both of our sizes in one package, which is unheard of. So I'm sure it will get some use from one or the other of us.
 I had been looking for a very specific shade of blue shirt to match a skirt I have and have never been able to find the right blue. So I finally gave up the search and just bought this knit fabric to make my own. I don't really have a design in mind yet, but I'm sure I'll come up with something.
 Here it is with the skirt. It's almost a cornflower blue - it has a lot of grey in it. I actually did buy a grey top to go with this skirt while I was at Ross, but it is kind of plain and boring so I'm hoping for something with a little more styling from this blue.
 I had to stop at Target to get some more of my favorite tea towels. I've decided to embroider these using the patterns from Grandma's stash. I found the pattern for her bias tape birds tea towel, and I think these will be done that way. There are 12 towels here, so I'll probably do a couple of different styles. I love tea towels. I think they absorb way more than regular dish towels once they get broke in. They sure don't seem like they would when you see them in the store, but I wouldn't trade my used ones for anything ... even though they are stained.
 I've come to the realization that I just really don't like knitting. But I promised myself I would continue until I have a finished product. So I'm going to knit a dishcloth or two and call it good. Ambitious, huh? I had started a scarf but I find working on it tedious rather than relaxing. Maybe it's the fact that I'm using a finer, softer baby weight yarn. I didn't mind knitting when I was learning with the regular stuff. Maybe this project will get me back into it and allow me to practice without stress. I like the variegated yarn and am looking forward to seeing what this will become.
 And last but not least, I picked up three fat quarters from my favorite quilt shop which happens to unfortunately be going out of business. I would have bought way more, but there were slim pickins as they say. I have no plans for these, but who could resist the cute little robots and a print with blackbirds wearing red high heels? Okay, so maybe some people could resist, but clearly I could not. Now, if you'll excuse me, I've got some sewing to get too...


.jpg)


%2B076.JPG)